Step-by-Step Guide to Upscale Videos: Tips and Tools

How can we enhance the visual quality of videos and make them appear sharper and more detailed? Is there a way to improve the resolution of older or lower-quality videos? These questions lead us to the fascinating world of video upscaling. In this paper, we explore the concept of upscaling videos, its techniques, and the software tools available to achieve this enhancement.
1. What is the “Upscale Video”?
Upscaling a video refers to the process of increasing the resolution and overall quality of a video by adding more pixels to the existing frame. This technique is used to enhance the visual appearance of a video, making it look sharper, clearer, and more detailed.
2. How to Upscale Videos?
Upscaling a video can be achieved using various software tools and techniques. Here’s a step-by-step guide on how to upscale a video:
Step 1: Select the Right Software
Choose a video editing or upscaling software that supports high-quality upscaling algorithms. There are both free and paid options available, each with different features and capabilities.
Step 2: Import the Video

Open the software and import the video you want to upscale. Most video editing software allows you to drag and drop the video file into the workspace.
Step 3: Backup the Original
Before you begin the upscaling process, it’s essential to back up the original video. This way, you can always revert to the original if you’re not satisfied with the results.
Step 4: Adjust Project Settings
Set the project settings to match the resolution and aspect ratio of the original video or the desired output resolution.
Step 5: Preview and Evaluate
Before upscaling the entire video, apply the chosen algorithm to a short segment of the video and preview the results. Evaluate the quality and make any necessary adjustments.
Step 6: Upscale the Full Video

Once you are satisfied with the settings and preview results, upscale the entire video using the selected algorithm.
Step 7: Export the Upscaled Video
After the upscaling process is complete, export the video in the desired format and resolution. Choose an appropriate file format and quality settings to maintain the improved visual quality.
Keep in mind that while upscaling can enhance the video’s visual quality, it cannot add true detail that was not present in the original. The effectiveness of upscaling also depends on the quality of the source material, so the results may vary for different videos.
3. How to Use Video Upscaler to Upscale Videos?
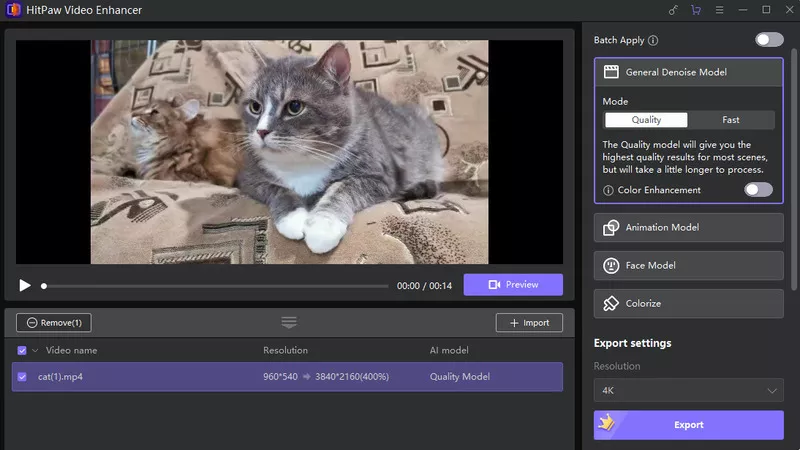
3.1 HitPaw Video Enhancer
To use HitPaw Video Enhancer to upscale videos, follow these steps:
Step 1: Launch the Software and Upload Video(s)
Download and install HitPaw Video Enhancer on your computer. Launch the software. Click on the “Add Files” or “Import” button to upload the video you want to upscale. You can add one or multiple videos at once.
Step 2: Select AI Model

After uploading the video, you’ll be prompted to choose an AI model that best suits your video type. Select the AI model that matches the specific issue you want to address or the enhancement you desire.
Step 3: Upscale the Video
Once you’ve selected the AI model, click on the “Enhance” or “Upscale” button to start the video upscaling process.
Step 4: Preview the Result
After the upscaling process is complete, you can preview the upscaled video to see the improvements made by the software. Use the playback controls to watch the video and evaluate the changes.
Step 5: Export the Upscaled Video
Once you are satisfied with the upscaled video, click on the “Export” or “Save” button.
Choose the desired output format, resolution, and quality settings for the upscaled video.
3.2 4DDiG Video Repair
To use 4DDiG Video Repair for upscaling videos, follow these steps:
Step 1: Download and Install 4DDiG File Repair
Start by downloading the 4DDiG File Repair tool from the provided link and install it on your computer.
Step 2: Launch the Software and Navigate to “Video Repair”
Launch the 4DDiG File Repair software. Find and select the “Video Repair” section.
Step 3: Download the Video Enhancement Toolkit
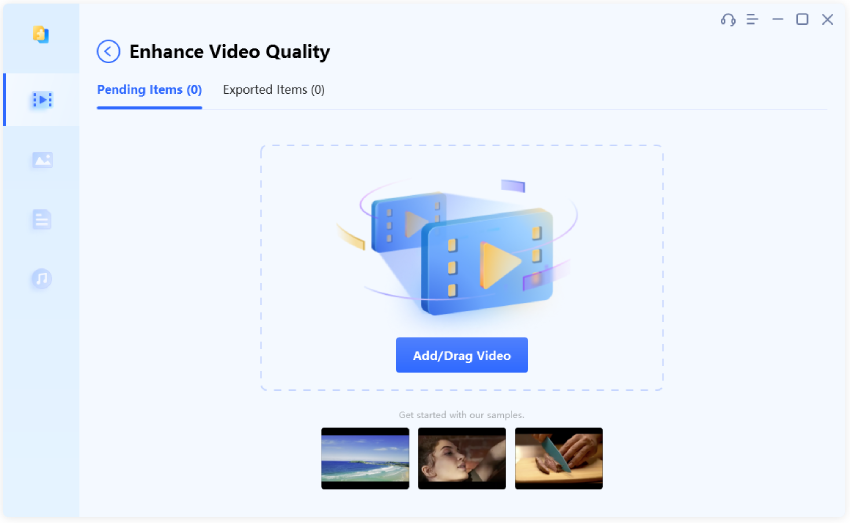
Under the “Enhance Video Quality” tab, click on the “Download” button to obtain the video enhancement toolkit. This toolkit contains the necessary resources for upscaling your video.
Step 4: Initiate the Toolkit and Add Your Video

After downloading the video enhancement toolkit, click the “Start” button to initiate it.
Use the “Add/Drag Video” button to import your desired video file from your computer’s storage.
Step 5: Select the Enhancement Model and Resolution
In the software interface, you will see the imported video. Besides that, there will be three models: General Model, Anime Model, and Face Model. Choose one model that best suits your video type. Each model may be optimized for specific types of videos.
Select the desired resolution under the chosen model.
Step 6: Preview the Upscaled Video
Click the “Preview” button to let the software start enhancing your video. Allow the software to complete the upscaling process.
Step 7: Export the Enhanced Video
Once you are satisfied with the upscaled video, click on the “Export” or “Save” button to export the enhanced video. Choose the destination folder and provide a name for the upscaled video.
By following these steps, you can effectively use 4DDiG Video Repair to upscale your videos and enjoy enhanced video quality for various purposes. Remember to choose the appropriate model and resolution based on your specific video type for the best results.
4. Conclusion
Upscaling a video can significantly enhance its visual quality by adding more pixels to the existing frame. This can be achieved using various software tools, each with different features and capabilities. HitPaw Video Enhancer and 4DDiG Video Repair are two examples of video upscalers that can help you achieve excellent results. By following the simple steps provided for each software, you can easily upscale your videos and enjoy improved visual quality for various purposes.


