I Love You So Much GIF: Make It Now!

Creating a high-quality “I Love You So Much” GIF is not only a way to express your love but also a way to showcase your creativity and design skills. In this article, we will explore how to create an “I Love You So Much” GIF using the powerful editing tool, Filmora. With Filmora’s range of features and capabilities, you can easily create a high-quality GIF that captures the essence of your love and affection. So, let’s get started on creating your own “I Love You So Much” GIF today!

1. The Power of Filmora for Creating GIFs
☀Intuitive Interface and Easy-to-Use Features
Filmora‘s user-friendly interface allows for easy creation and customization of GIFs. Its simple drag-and-drop functionality, built-in effects, and text tools make it easy for beginners to create high-quality GIFs in minutes.
☀Versatile Editing Options
With Filmora, users can edit their GIFs with a wide range of options, including cropping, resizing, and adjusting the playback speed. Its advanced editing tools, such as color correction and noise removal, allow for professional-level customization.
☀Integration with Other Programs
Filmora’s compatibility with other programs, such as Photoshop and After Effects, allows for easy integration of assets and seamless workflow between programs. This makes it a powerful tool for professional animators and designers.
☀Export Options and Sharing Capabilities
Filmora allows for easy exporting of GIFs in a variety of formats, including high-quality GIFs optimized for social media sharing. With its built-in sharing options, users can easily share their creations with the world.
2. Step-by-Step Guide on Creating an “I Love You So Much” GIF
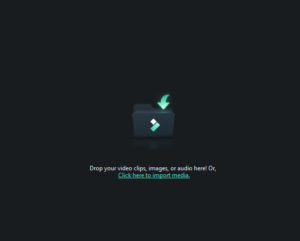
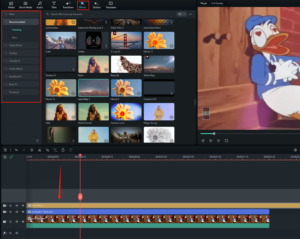
Step 1: Import your video clip
Open Filmora and click “Import” to select the video clip you want to turn into a GIF. You can use any video clip you like, or record a new one specifically for this purpose.
Step 2: Add the clip to the timeline
Drag the video clip from the media library to the timeline at the bottom of the screen. This is where you will edit the clip to create your GIF.
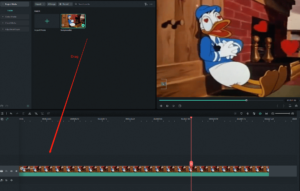
Step 3: Trim the clip
Trim the video clip to the desired length by clicking and dragging the edges of the clip on the timeline. Make sure the clip is short enough to work well as a GIF.
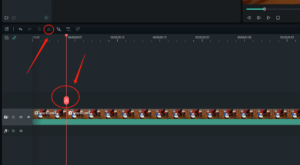
Step 4: Add text
Click on the “Text” tab on the left side of the screen. Here, you can select the font, size, and color of your text. Type “I Love You So Much” into the text box, and drag the text to the desired location on the video clip.
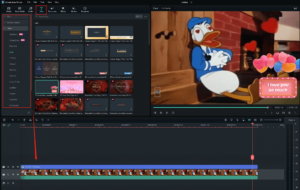
Step 5: Add effects (optional)
You can add effects to the clip by clicking on the “Effects” tab on the left side of the screen. Here, you can select various filters, transitions, and other effects to enhance your video clip and text.
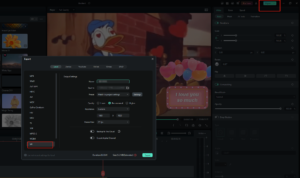
Step 6: Export as a GIF
Click the “Export” tab at the top of the screen. Select “GIF” as the output format from the drop-down menu.
3. Tips for Creating Personalized GIFs with Filmora
❤Choose the right font and color
When adding text to your GIF, choose a font and color that match the tone and style of your message. A bold font with bright colors may work well for a playful or lighthearted message, while a more elegant font with subdued colors may be more suitable for a romantic or sentimental message.
❤Use a transparent background
If you want to add images or text to your GIF, make sure to use a transparent background. This will allow your images and text to blend seamlessly with the video clip.
❤Experiment with effects and transitions
Filmora offers a wide variety of effects and transitions that you can use to enhance your GIF. Try experimenting with different effects and transitions to create a unique and eye-catching GIF.
❤Choose the right dimensions
When creating a personalized GIF, make sure to choose the right dimensions for your GIF. The dimensions should match the size and aspect ratio of the video clip you are using. You can find the dimensions in the “Export” menu in Filmora.
❤Keep it simple
When adding personal messages or images to your GIF, keep it simple. Don’t overcrowd the GIF with too much text or too many images. A simple, clear message will be more effective than a cluttered one.
❤Customize the duration and loop settings
When exporting your GIF, make sure to customize the duration and loop settings to fit your needs. You can adjust the duration to match the length of your message or the video clip, and you can choose whether to loop the GIF once or continuously.
With these tips, you can create personalized GIFs with Filmora that are unique, eye-catching, and effective in conveying your message.
Sharing the “I Love You So Much” GIF


4. Summary
This paper highlights the benefits of using Filmora as a reliable and easy-to-use tool for creating personalized GIFs for all occasions, including Valentine’s Day, anniversaries, birthdays, and more. So go ahead and get creative – the possibilities are endless!