How to Reverse a Video on CapCut?

In the world of video editing, reversing a video can add an interesting and creative twist to your content. Whether you want to create a unique effect, showcase a specific skill, or simply have some fun, video reversal can turn an ordinary clip into an engaging and captivating piece. While the CapCut app offers various video editing features, it has limitations when it comes to reversing videos. This is where Filmora steps in as a powerful and versatile alternative.

In this paper, we will explore the benefits of using Filmora over CapCut for reversing videos, highlighting Filmora’s user-friendly interface, advanced editing tools, and features that make it an excellent choice for video reversal projects. We will also provide a step-by-step guide on how to reverse videos with Filmora and discuss additional editing features that can enhance your reversed videos.
1. How to Reverse a Video on CapCut?
Step 1: Start with CapCut
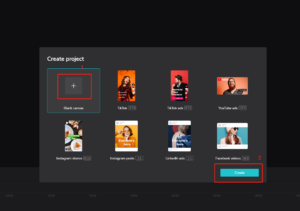
You can use the web version of CapCut or download and install CapCut from the CapCut official website. Open the editing page, click the “+” icon and then click “Start” to create a new project.
Step 2: Import and reverse video
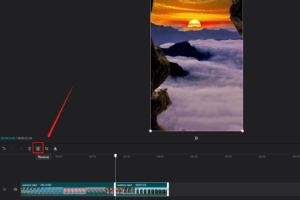
Import videos by clicking “Add Video” and selecting the desired video. Click on the video in the timeline, click “Edit”, and then “Reverse” the appropriate segment.
Step 3: Preview, save and share
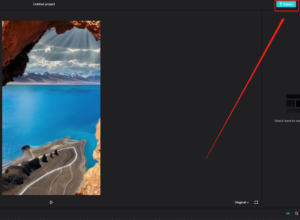
After that, preview the reversed video. When satisfied, click “Export” to save it to your gallery, ready to share on social media or other platforms.
2. Why Choose Filmora Over CapCut for Reversing Videos?
◊Advanced Features
Choose Filmora over CapCut for reversing videos because it offers advanced features and editing tools. Filmora provides a versatile and user-friendly interface, making it suitable for both beginners and experienced editors.
◊Precision and Control
Filmora allows for greater precision and control over video reversal compared to CapCut. Adjust the playback speed, apply effects and transitions, and enhance the reversed video with a wide range of editing tools at your disposal.
◊Compatibility and Export Options
Filmora is compatible with various video formats, ensuring seamless editing and reversal. Moreover, Filmora offers a wide range of export options, including different file formats and resolutions, allowing users to share their reversed videos on multiple platforms effortlessly.
◊Extensive Media Library
Filmora boasts an extensive media library, including royalty-free music, sound effects, and pre-built elements. These resources enable users to elevate their reversed videos, adding a professional touch that may be challenging to achieve with CapCut.
3. How to Reverse Videos with Filmora: A Step-by-Step Guide
Step 1: Import Video
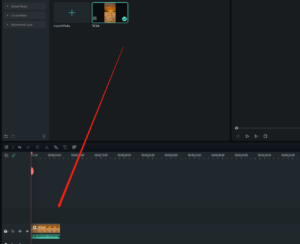
Open Filmora, start a new project, and import your video. Place the video clip onto the timeline.
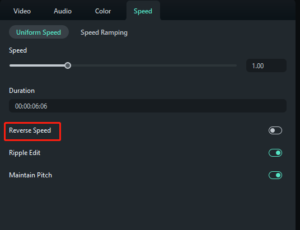
Step 2: Reverse Video
Right-click the video on the timeline, select “Speed and Duration,” and check the “Reverse” box.
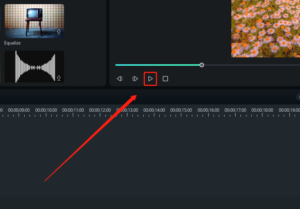
Step 3: Preview and Adjust
Preview the reversed video and make adjustments to speed or duration if needed.
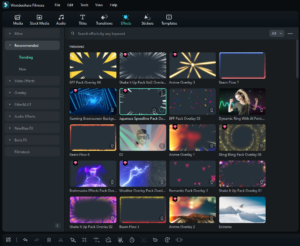
Step 4: Enhance Video (Optional)
Add effects, transitions, or text from Filmora’s library to enhance your video.
Step 5: Export and Share
Click “Export,” choose the format and quality, and save the video. Share your reversed video as desired.

4. What Additional Video Editing Features Can Filmora Offer?
✯Effects Library
Filmora offers a vast effects library, including filters, overlays, and animated elements. These effects can elevate your video’s overall look and feel, giving it a more professional and polished appearance.
✯Transitions
Smooth transitions between video clips are crucial for maintaining viewer engagement. Filmora has a wide range of transitions available, from basic fades to more dynamic and creative options, allowing you to create seamless transitions that match your video’s style.
✯Text and Titles
Adding text and titles to your videos can help convey important information or add a creative touch. Filmora’s user-friendly text editor lets you customize fonts, colors, and animations, making it easy to create eye-catching titles and captions.
✯Audio Editing
Filmora’s audio editing tools enable you to control the sound in your videos. You can add background music, sound effects, or voiceovers, adjust volume levels, and remove background noise to create a polished and professional audio experience.
✯Advanced Editing Features
Filmora also offers advanced editing features, such as color correction, green screen effects, and motion tracking. These tools allow you to create more complex and visually appealing videos, setting your content apart from the competition.
5. Conclusion
Although Capcut is useful for basic video reversal, Filmora offers a more comprehensive and user-friendly solution for reversing and editing videos. With a range of advanced tools and features, Filmora enables you to create higher-quality reversed videos with ease. Our easy-to-follow guide highlights the simplicity of using Filmora for video reversal, making it an ideal choice for both beginners and experienced editors. Try Filmora for your video reversal projects and discover its full potential for crafting engaging and polished content.