Master Adding Text in DaVinci Resolve: Step-by-Step Guide

Adding text to videos is a crucial aspect of video production. Whether it’s for providing context, emphasizing a point, or simply guiding the viewer, text can significantly enhance the overall impact of a video.
1. How to Add Text in DaVinci Resolve?
In DaVinci Resolve, you have the option to add text in various forms – standard text, animated text, subtitles, credits, and more. In this section, we’ll share how to add standard text to your videos easily.
Step 1: Import Video Clip to DaVinci Resolve
Firstly, you need to import a video clip to the editor before you start adding text. You can import media through the following three ways:
-
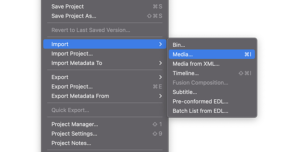
Using the top menu, go to File > Import File > Media. Locate the video you want to import and then click Open.
-
Press CTRL + I if you’re using Windows or CMD + I if you’re using Mac to import media.
-
Alternatively, drag and drop the video clip from Explorer or Finder into DaVinci Resolve.
Step 2: Create a New Timeline
Once you have imported your video clip, it’s time to create a new timeline to add your text to. Follow these steps:
-
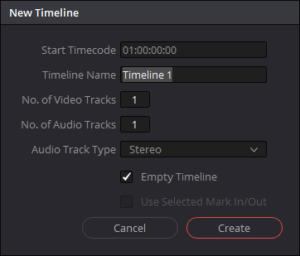
Select the File in the menu bar and select New Timeline.
-
You can use the shortcut keys, CTRL+N (Windows) or CMD+N (Mac) instead to create a new timeline quickly.
-
Alternatively, click on the video clip you have imported and select Create New Timeline Using Selected Clips.
Step 3: Add Standard Text to Your Video
The Effects Library provides different effects, including text, which you can use to edit your video. Follow these simple steps:
-
Switch to the Edit panel at the bottom of the screen.
-
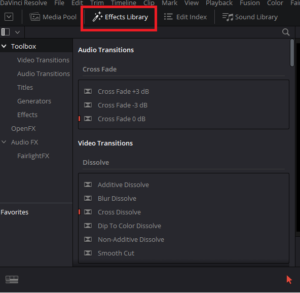
Go to the top menu and select Titles under the Toolbox tab in the Effects Library.
-
Drag and drop the text effect above the video clip on the timeline.
-
Select the text on the timeline, and it will open the Inspector tab where you can edit and customize the text. Edit the font, font style, size, background color, line spacing, and more.
Step 4: Save the Video

Once you’re done editing your video, you can now save it to your computer by clicking on File and choosing Export.
Remember that there are more ways to add text to your video that you can explore in the Effects Library, including 3D text, which we’ll highlight in the next section.
2. How to Add 3D Text in DaVinci Resolve
Are you ready to take your text to the next level? DaVinci Resolve has a Fusion feature that allows you to create animated titles using 2D and 3D text tools. With Fusion, you can add cool effects like reflections, shadows, bump maps, and even animate individual letters.
Here’s how to add 3D text using Fusion:
Step 1: Choose and Add a Fusion Title

First, open the Fusion Titles category and choose a preset from the list. Drag and drop it onto your timeline. In this guide, we’ll choose the 3D Title in a Box option.
Step 2: Edit the Text Content

Open the Inspector window to access the Main Text controls. Here, you can edit the text content, font, size, color, and spacing. As you make changes, you’ll see them immediately reflected in the blue line above the text layer.
You can also edit other components of the title, such as the Box Material, Main Light, Back Light, and Motion Blur Controls. Use these controls to transform the preset into your desired look.
Step 3: Customize with Nodes

To truly make your title unique, you can access the nodes that define it. Double-click the stack in the lower window to reveal all the nodes. From here, you can make different edits to the 3D elements and create a unique look for your title.
With the Fusion feature in DaVinci Resolve, you can create eye-catching 3D text titles that will make your videos stand out.
A Simplified Method for Adding Text to Videos – Filmora
Step 1: Import and Add a Video to the Timeline

Before editing your video, import it to the media library to ensure your original files remain safe. Drag and drop your selected video to the timeline to begin adding text and titles.
Step 2: Apply Text Templates and Enter Text

Select “Titles” from the top menu to access over a hundred text templates and presets, including custom title effects for special events. Preview the effect of each by double-clicking on each preset, before dragging and dropping your choice onto the timeline. Customize text, colors, animations, and more in the Text Editor panel.
Step 3: Advanced Editing Options

For more advanced editing options, access the advanced text editing panel and customize the text and title effects to your preference. Add text boxes of different shapes and adjust the text fill, border, and shadow as desired.
Step 4: Adjust Text Position and Duration

Easily move added titles around the timeline and adjust their display times by dragging text thumbnails or adjusting the duration of the text effect. To delete a title, simply select it and click the Delete button above the timeline.
With these easy-to-follow steps, you can add professional-quality text and titles to your videos using Filmora.
3. Final Thoughts
Adding text to your videos is essential, as it helps to convey information and make your content more captivating. In DaVinci Resolve, you have a range of options to add text, including standard text, animated text, subtitles, credits, and even 3D text using the Fusion feature. Additionally, Filmora offers a simplified approach to add text, with over a hundred text templates and presets to choose from. With these easy-to-follow steps, you can elevate your video productions by seamlessly adding text and titles.
4. FAQs about Adding Text in DaVinci Resolve
✎How do I animate text in DaVinci Resolve?
To animate text in DaVinci Resolve, you can use keyframes to change the position, opacity, rotation, or other properties of the text over time. Select the text clip on the timeline, then click the Inspector panel and select the Animation button. Use the keyframe controls to create and adjust the animation.
✎Can I use my own fonts in DaVinci Resolve?
Yes, DaVinci Resolve allows you to import your own fonts into the software. To import a font, go to the Fusion page, select the Media Pool, and right-click to create a new folder. Drag and drop the font into the folder, then restart DaVinci Resolve to use the font in your project.
✎How do I create a text crawl or scrolling credits in DaVinci Resolve?
To create a text crawl or scrolling credits in DaVinci Resolve, use the Text+ tool and keyframe animation. First, create a long text clip with all the credits or text you want to include. Then, adjust the position and size of the text clip to make it off-screen. Finally, use keyframes to animate the position of the text clip over time, creating a scrolling effect.
✎How do I add text effects in DaVinci Resolve?
To add text effects in DaVinci Resolve, use the Text+ tool and apply different effects such as drop shadow, outline, or glow. Select the text clip on the timeline, then enter the Inspector panel and click the Effects button. Choose the effect you want to apply, then adjust the settings as needed.