[Top Strategy] How to Record from Apple Music with Wondershare Filmora?


1. Overview of Wondershare Filmora
Wondershare Filmora is a powerful video editing software that allows users to create amazing videos easily.
It makes complex functions simple so that anyone can use them, including those who are new to video editing.
With over 100 transitions, motion tracking, speed adjustment, green screen, chroma key, titles and effects, colour grading, colour match, audio ducking, keyframing, tilt-shift, motion tracking, masks, 3D LUTs, over 800 built-in video effects, split screen templates, and more, it is brimming with features for both home and business use.
It has a straightforward interface and is available for macOS 10.14 – macOS 11 or later, and Apple M1 chip compatible. It also offers support for custom shortcuts and Touch Bar support for MacBook Pro users. Users of Wondershare Filmora can easily start their creations and send them immediately to loved ones.
2. What You Need to Know before Recording Music with Wondershare Filmora
★You need to download the proper file format
Wondershare Filmora is a great program for recording music, and the best file format to use is MP3.
The Format panel at the bottom left of the converter has the MP3 format as the recommended output, and once you’ve selected it and adjusted your parameters, you can begin to edit and add special effects to your audio tracks.
You can also uncheck any songs you don’t want to convert before clicking the Convert button. After the conversion is finished, you can quickly locate the downloaded music files by clicking the folder icon.
To upload your music to iTunes, you can use Siri Shortcuts to store the Apple Music files in the cloud and then remove the protected format and download it to a virtual storage space.
You can then export the music and video to Filmora, where you can choose the recording format, including WMV, MP4, GIF, and MP3.
★Make sure you have the right audio editing software
The importance of having the right audio editing software when recording music with Wondershare Filmora cannot be overstated. Audio editing software allows for precise control over the sound and quality of the audio.
With Wondershare Filmora, users can add music or audio tracks to their creations, record a voiceover, adjust each track individually, and reduce background noise.
Furthermore, users can precisely cut audio tracks with the frame-by-frame, timeline-based, and multi-track editing tools that are available. All of these features make Wondershare Filmora an ideal choice for recording music.
★Know which rights you have to the music you record
When recording music with Wondershare Filmora, users are granted certain rights to the music. Most importantly, users are not allowed to distribute or sell the music they have recorded without obtaining the proper licenses.
Additionally, users do not have the right to modify or alter the recorded music in any way without obtaining the necessary permissions.
Furthermore, users are not allowed to use the music for any commercial purposes unless they have obtained the necessary licenses from the copyright holder. It is important to note that these rights may vary depending on the type of music being recorded.
★Make sure you have the right software for screen recording
The right software for screen recording with Wondershare Filmora is essential for high quality video recordings. With the appropriate software, HD videos can be recorded quickly with cutting-edge hardware acceleration and screen activity without watermarks or limits.
Furthermore, some programs, such as iTop Screen Recorder, let users record audio-only versions of chats, lectures, music, and other noises. This product is perfect for recording Apple Music since it allows you to record music and video at the same time.
Furthermore, Wondershare Filmora Screen Recorder is designed with a delightful, intuitive design and an easy-to-use interface, so it’s easy to record whatever you need. With these features, Wondershare Filmora Screen Recorder provides an optimal screen recording experience.
★Make sure you have the right software for video editing
With Wondershare Filmora, the same program that edits videos also offers motion graphics and audio editing, as well as fast rendering times and a clean user interface.
There are several features that Wondershare Filmora and the best video editing software for Macs in 2023 both offer, including transitions between clips, text titles and subtitles, and entertaining effects.
Additionally, both offer templates to arrange content for a more compelling presentation.
Though Wondershare Filmora and the best video editing software for Macs in 2023 share many of the same features, the video editing software for Macs offer more extensive audio capabilities, such as being able to make it sound like the video was recorded in a large concert hall or stadium.
3. How to Record from Apple Music Using Wondershare Filmora?
Step 1: Install Filmora
How do you install Wondershare Filmora? Step-by-step instructions

-
Download Filmora and install it on your Mac or Windows computer.
-
Start the program, then select New Project.
-
If you haven’t already done so, you can upgrade the software to its full paid version by clicking Register after the video editor loads.
-
Open File Explorer and select This Computer > Windows (C:).To open the Program Files folder and look for the Wondershare folder, double-click on it. Find it, open it, then launch Filmora.
Once installed, you can start making videos with Filmora.
Step 2: Sign in to your Wondershare account
Signing in to your Wondershare account to record from Apple Music is simple.

-
Click the ‘Sign in’ button and enter your Apple ID. Then, go to File Explorer > This PC > Windows (C:) and double-click on the Program Files to open it and browse for the Wondershare folder.
-
Open the folder, and open Filmora. When you are ready to create a video project, click the ‘FILE’ icon in the upper left corner of Filmora Video Editor’s main window.
-
Select ‘Save Project’ or ‘Save Project As’ to save the project, and merge the files in your project if you want to create a single video file.
Step 3: Select a song

-
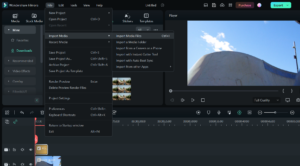
Launch the program and select “File” from the menu bar, then click “Import Media Files.”
-
Navigate to your Apple Music library and select the desired song you want to import into Wondershare Filmora.
-
Click “Open” and the music will be imported into the program.
-
Select the song from the “Media” library, drag and drop it on the timeline.
-
You can now edit the song and add special effects to your video.
-
When you’re finished editing, click “Export” to save the video to your computer.
Step 4: Start recording

-
Download and install Wondershare Filmora on your Mac.
-
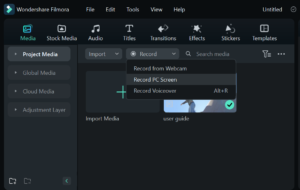
Open Filmora and click the Record button in the upper right corner.
-
Select the sound source that you want to record, such as Apple Music.
-
Play the music in Apple Music and click the Record button to start recording.
-
When you’re finished recording, click the Stop button.
-
Save the recorded audio file by clicking File > Save and choosing a name and location.
Step 5: Add visuals to your video
Wondershare Filmora is a powerful video editing software that can be used to create stunning visuals for an Apple Music video.

Here is a step-by-step instructions on how to add visuals to your video using Filmora:
-
Download and install Filmora on your computer.
-
Open your project in Filmora and click File > Project Settings to select your aspect ratio.
-
Click Import > Import Media Files and select the media you want to edit.
-
To organize your media files, click on My Album > Add a New Folder and organize your files.
-
To add visuals to your music video, click Effects and select a suitable effect.
-
Drag and drop the effect onto your video clip.
-
To adjust the effect, double click on it, and adjust the settings to your preference.
-
Once you are done, click Export to save your video.
With Filmora, you can easily add visuals to your Apple Music video in no time. With its simple drag-and-drop functionality and feature-rich editing tools, you can create stunning videos that will be sure to impress your audience.
Step 6: Edit your video
Editing videos with Wondershare Filmora is a breeze. With its easy-to-use interface, intuitive tools and features, and fast render performance, you can create stunning videos in no time.

Here’s a step-by-step instructions on how to use Filmora to edit your videos:
-
Launch the software and select New Project. If you haven’t upgraded to the full version, click Register.
-
Click on the File > Then click on Project Settings > adjust the aspect ratio, resolution, and frame rate as desired.
-
Import the files you want to edit by clicking Import > Import Media Files, or download them directly from Facebook, Instagram, Flickr, etc.
-
To start editing, drag and drop the files you want onto the timeline, and rearrange them as needed.
-
Add some visual effects where needed, some other essentials like music, filters, transitions, or overlays.
-
When you are done, click Export and select the video file format you want.
-
Select where you want to store your project in PC or Mac. If you want to export it directly to Vimeo or Youtube you can do that.
-
Finally, edit the audio quality in the way you like for your finished video.
There you have it! Now you know how to edit videos created with Wondershare Filmora in just a few simple steps.
Step 7: Share your video
Sharing a video recorded with Wondershare Filmora is a simple and straightforward process. Follow the instructions:

-
Launch Wondershare Filmora and open your project.
-
Click on the File icon and select Save Project or Save Project As to save the project.
-
Select an option from the Device drop-down menu to access optimized videos for your desired device.
-
Click on Export to save the video as a file, burn it to a disc, or upload it directly to YouTube and Vimeo.
-
Finally, share your video with the world by posting it to your website or social media platform.
4. Conclusion
With Wondershare Filmora, you can create high-quality videos in no time and share them with the world. And if you’re looking for more tips and tricks, check out the InVideo community – a place to connect and learn from 25,000+ marketers, business owners, and creators like yourself.
