[Latest Guide] How to Remove Background Noise in Premiere Pro?

Removing background noise is a common challenge in video production, as it can significantly impact the quality and professionalism of the final product. In this guide, we will learn various methods to remove background noise in Adobe Premiere Pro. We will cover the traditional DeNoiser Effect, the advanced features of the Essential Sound Panel, and even an alternative AI-powered solution.
By following these techniques, you can enhance the audio quality of your videos and create a more immersive viewing experience for your audience. Let’s dive in and learn how to effectively eliminate background noise in Premiere Pro.
1. How to Remove Background Noise in Premiere Pro?
Method 1: Using the DeNoise Effect
Step 1: Selecting the Video and Opening Effects Panel
To begin with, choose the video clip you want to remove background noise from in Adobe Premiere Pro. After importing the video, go to the “Window” menu and click on “Effects”.
Step 2: Choosing the DeNoiser (Obsolete) Effect

In the Effects panel, locate and click on “Obsolete Audio Effects”. From the list that appears, select “DeNoiser (Obsolete)”. If prompted to use the latest version, click “NO” to continue with the current DeNoiser (Obsolete) feature.
Step 3: Applying the DeNoiser Effect
Drag and drop the DeNoiser effect onto the video clip where you want to reduce noise. Once applied, go to the “Effect Controls” panel and click on “DeNoiser”.
Step 4: Adjusting the Noise Reduction Settings
Within the DeNoiser settings, find the “Reduce Noise By” option. Use the sliders on the bar to decrease the noise level. It is recommended to aim for a range of -5 to -10, which usually results in a significant reduction of noise.
Step 5: Finalizing the Noise Reduction
Preview the video clip with the applied DeNoiser effect to assess the noise reduction. Make further adjustments to the noise reduction settings if necessary to achieve the desired result.
By following these steps, you can effectively utilize the DeNoiser Effect in Adobe Premiere Pro to remove background noise from your videos.
Method 2: Using the Essential Sound Panel
Step 1: Opening the Essential Sound Panel
Before we delve into each feature, navigate to the Essential Sound panel. You can find it by going to the “Window” menu and selecting “Essential Sound”.
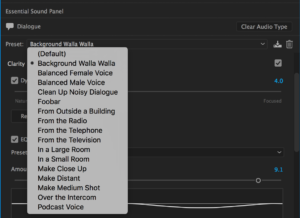
Step 2: Selecting the Video and Choosing Dialogues
Import the video clip you want to remove noise from and select the “Dialogues” category in the Essential Sound panel. This ensures that the panel provides relevant options for noise reduction.
Step 3: Using the Reduce Noise Option
In the Repair section of the Essential Sound panel, locate and use the “Reduce Noise” option to adjust the amount of noise present in the video. Slide the bar according to your specific needs.
Step 4: Lowering Wind Noise with Reduce Rumble
If your video has background noise caused by wind or movement, utilize the “Reduce Rumble” option in the Essential Sound panel. This feature helps in reducing such noises effectively.
Step 5: Reducing Frequency-Based Noise with DeHum
Adjust the slider for the “DeHum” option to lower noise caused by various frequencies. This feature can significantly improve the audio quality by minimizing unwanted hum or low-frequency noises.
Step 6: Removing Sibilance with DeEss
If your video contains irritating “S” sounds or sibilance, you can eliminate them using the “DeEss” option in the Essential Sound panel. Adjust the slider to reduce sibilance according to your preferences.
Step 7: Minimizing Reverb with Reduce Reverb
The “Reduce Reverb” option in the Essential Sound panel helps reduce background noise caused by echo or reverberation. Adjust the settings to effectively reduce echo and create a cleaner audio output.
By following these steps and utilizing the various features available in the Essential Sound panel, you can successfully remove background noise and address specific noise-related issues in your videos using Adobe Premiere Pro.
2. Tips and Tricks for Effective Noise Removal in Premiere Pro

①Use a combination of methods
Experiment with both the DeNoiser Effect and the Essential Sound Panel to find the best results for your specific video and audio. Each method has its strengths and may work better in different scenarios.
②Adjust settings carefully
When using noise reduction features, be cautious not to overdo it, as it can result in unnatural or distorted audio. Fine-tune the settings to strike a balance between reducing noise and preserving the quality of the audio.
③Apply noise reduction selectively
If the background noise is not consistent throughout the entire video, consider using keyframes or other techniques to apply noise reduction only where necessary. This helps to maintain the natural flow of the audio and prevent unnecessary noise reduction in clean sections.
④Use headphones for monitoring
When removing background noise, it’s crucial to listen carefully to the changes in audio. Using high-quality headphones allows you to detect any artifacts or unintended alterations caused by the noise reduction process.
3. Alternative AI Noise Remover to Remove Background Noise
If you’re looking for an alternative solution to remove background noise, you can try using HitPaw Video Converter, which offers a dedicated AI Noise Remover feature. Follow the steps below to eliminate unwanted noise from your audio:
Step 1: Download and Launch HitPaw Video Converter

Start by downloading and installing HitPaw Video Converter on your Windows or Mac computer. Once installed, launch the program and navigate to the “Toolbox” tab, where you can access additional features.
Step 2: Access the AI Noise Remover

In the Toolbox tab, locate and click on the “Noise Remover” feature. This will enable you to utilize the AI-powered noise removal functionality.
Step 3: Add the File to Remove Noise

Drag and drop the file you want to remove noise from into HitPaw Video Converter. Alternatively, you can use the “Add File” button to select the file manually.
Step 4: Wait for the Noise Removal Process to Complete

Once the file is added, HitPaw Video Converter will automatically start the noise removal process. Wait for the software to analyze and remove the background noise. This may take some time depending on the file size and complexity.
Step 5: Export the File without Noise

After the noise removal process is complete, you can export the file without the background noise.
HitPaw Video Converter provides options to select the desired output format and customize the output settings according to your preferences.
By following these steps and utilizing HitPaw Video Converter’s AI Noise Remover feature, you can easily remove background noise from your audio files. Download HitPaw Video Converter now to experience a free trial of this powerful noise removal tool.
4. Conclusion
Adobe Premiere Pro offers effective methods for removing background noise from videos. The DeNoiser Effect and Essential Sound Panel provide straightforward steps to reduce noise and enhance audio quality. Additionally, HitPaw Video Converter offers an alternative AI Noise Remover feature for efficient noise removal. Choose the method that suits your needs and enjoy cleaner audio in your videos.
5. FAQs
Q: Which versions of Premiere Pro support these noise removal methods?
A: These methods are applicable to multiple versions of Adobe Premiere Pro.
Q: Can I completely remove background noise without affecting the desired audio?
A: Complete removal without impacting desired audio is challenging, but noise reduction can significantly reduce it.
Q: Should I use the DeNoiser Effect or Essential Sound Panel for noise removal?
A: Both methods have advantages, so try both to find the best solution for your video.
Q: Can I remove noise from an already edited video clip?
A: Yes, apply noise reduction techniques to the affected clip or audio track separately.