How to Edit Transitions on Reels: A Step-by-Step Guide

Do you wish to improve the quality of your Instagram Reels? Is it your goal to have your videos go viral and leave an indelible impression on your viewers? Well, look no further! In this guide, we’ll unlock the secrets to creating jaw-dropping Instagram Reels by harnessing the power of transitions.

Blank template, mock-up page of social media mobile app. Post, history. Tape of photos. Page interface design. Vector illustration.
1. Why Add Transitions on Instagram Reels?
Enhance Visual Appeal
Transitions on Instagram Reels can significantly enhance the visual appeal of your videos. They provide a smooth and seamless flow between clips, making your content more engaging and captivating to viewers.
Create a Professional Look
Incorporating transitions into your Reels can help you achieve a more professional and polished look. Transitions add a level of sophistication and finesse to your videos, making them appear well-crafted and thoughtfully edited.
Improve Storytelling
Transitions play a crucial role in storytelling. By using transitions strategically, you can effectively convey narrative elements, highlight key moments, and guide the viewer’s attention. They help create a coherent and fluid narrative structure, enhancing the overall storytelling experience.
Maintain Viewer Engagement
Instagram Reels are often short and fast-paced. By adding transitions, you can maintain viewer engagement throughout the video. Smooth transitions can hold the viewer’s attention and make the viewing experience more enjoyable, reducing the likelihood of them scrolling past your content.
2. Types of Transitions on Instagram Reels
-
Cut: The basic cut transition that creates a seamless switch between clips
-
Fade: Smoothly fading in or out between clips for a gradual transition effect
-
Slide: Sliding from one clip to another, adding a dynamic and energetic transition
-
Dissolve: Creating a smooth blend between clips for a seamless and fluid transition
-
Zoom: Zooming in or out between clips, adding emphasis or creating an immersive effect
-
Flip: Flipping or rotating the screen to transition between clips, offering a unique visual effect
-
Spin: Rotating the screen rapidly to transition between clips, creating a fast and dynamic effect
-
Strobe: Rapidly flashing between clips, adding a high-energy and attention-grabbing transition
-
Whip Pan: Quick panning movement to transition between clips, adding a dramatic and fast-paced effect
-
Overlay Effects: Applying overlays or visual effects to transition between clips, enhancing creativity and style
3. Step-by-step Guide to Editing Transitions on Reels
Editing transitions on Instagram Reels is a straightforward process. Follow these steps to add and adjust transitions between clips:
Step 1: Open the Reels Editor

Launch the Instagram app on your mobile device and tap on the “+” button at the bottom of the screen. Select “Reel” to start creating a new Reel.
Step 2: Add Clips
Tap on the camera icon to start recording or select pre-recorded clips from your camera roll by tapping on the gallery icon. Add the desired clips to your Reel in the order you want them to appear.
Step 3: Access Transition Options
Once your clips are added, tap on the “Stickers” icon located on the top-right corner of the screen. From the sticker tray, select the “Effects” option.
Step 4: Explore Transitions
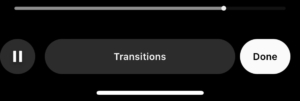
In the Effects section, scroll through the available effects until you find the “Transitions” category. Tap on it to access a variety of transition options.
Step 5: Apply a Transition
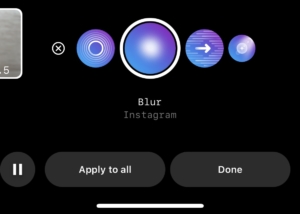
Select the transition you want to use by tapping on it. This will apply the chosen transition between the current clip and the next one.
Step 6: Adjust Transition Duration
By default, transitions have a set duration. To adjust the duration, tap on the transition icon between the clips. A slider will appear that allows you to increase or decrease the duration of the transition. Drag the slider to the desired length.
Step 7: Preview and Refine
To preview your Reel with the applied transition, tap on the play button located at the bottom of the screen. If you’re satisfied with the result, proceed to the next step. Otherwise, go back and adjust the transition duration or select a different transition.
Step 8: Add Additional Transitions
Repeat steps 5 to 7 to add more transitions between clips in your Reel. Experiment with different transition types and durations to achieve the desired effect.
Step 9: Save and Share
Once you’re satisfied with the transitions in your Reel, tap on the arrow icon located at the bottom-right corner of the screen. Add a caption, hashtags, and other desired elements, then select the audience you want to share the Reel with. Finally, tap on “Share” to publish your Reel.
4. How to Add Transitions that Instagram Doesn’t Come With?
Step 1: Download and Install Wondershare Filmora
- Get Wondershare Filmora from the official website.
- Choose the appropriate version for your operating system (Windows or Mac).
- Follow the installation instructions to complete the setup.
Step 2: Import Video/Photos to the Project
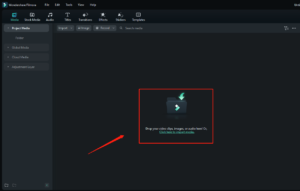
- Launch Wondershare Filmora.
- Click on the “Import” button to add your video and photo files.
- Select the desired files from your computer and import them into the project.
- Drag and drop the imported media files onto the timeline for editing.
Step 3: Access the Transition Library
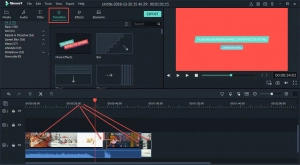
- Locate the “Transition” tab or button in the Filmora interface.
- Click on it to open the transition library.
Step 4: Choose and Apply Custom Transitions
- Browse through the available transition options.
- Select the custom transitions that you want to use in your Instagram Reels.
- Drag and drop the chosen transitions between the video and photo clips on the timeline.
Step 5: Adjust Transition Duration (Optional)
- If needed, you can adjust the duration of the transitions.
- Click on a transition in the timeline to select it.
- Look for the duration adjustment controls and modify the length as desired.
Step 6: Preview and Fine-tune
- Play the edited Reel in the preview window to review the transitions.
- Make any necessary adjustments to the placement or duration of the transitions.
Step 7: Export the Video
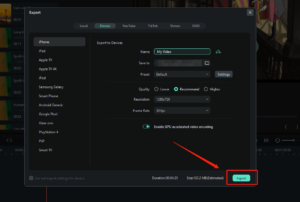
- Once you are satisfied with the transitions, click on the “Export” or “Create” button.
- Choose the desired video format and quality settings for your Instagram Reel.
- Specify the output location and click on “Export” to generate the final video file.
5. Conclusion
Whether using the built-in transitions provided by Instagram or exploring additional options with tools like Wondershare Filmora, transitions offer a creative way to enhance the flow and overall impact of your Reels. By following a step-by-step guide, you can easily edit and customize transitions, making your Instagram Reels more captivating and memorable. So, go ahead and experiment with different transitions to bring your Reels to life and make a lasting impression on your audience.