Vimeo to MP4: Which Conversion Method is Best?

In recent years, online video streaming has grown in popularity as a method of media consumption. Vimeo is one of the various video-sharing platforms accessible for users to watch and share videos. Some users may want to download Vimeo films in the MP4 format, which is compatible with the vast majority of devices and media players. It can be difficult to identify which of the several techniques for converting Vimeo films to MP4 is the most successful. This research seeks to investigate and contrast several conversion methods and evaluate their advantages and disadvantages in order to establish the optimal approach for converting Vimeo films to MP4. By doing so, users can make informed selections regarding the Vimeo-to-MP4 conversion technique they choose.

There are various ways to convert Vimeo videos to MP4, including online video converters and video converter software. In this section, we will introduce a step-by-step guide for using an online video converter, as well as a few popular video converter software options.
1. A Step-by-Step Guide to Using Online Converters
Video files can be converted from one format to another using online converters, which are websites that do not require users to download any additional software. Using an online converter to transform your Vimeo videos into MP4s can be a quick and inexpensive solution.
Two examples of popular online converters are Online Video Converter and ClipConverter. These websites offer a simple and user-friendly interface that allows users to upload their Vimeo video file and choose the desired output format, such as MP4. Here are some steps to using online converters:
Online Video Converter
Step 1: Enter Online Video Converter website
Launch your web browser and navigate to Online Video Converter. And then tap the ” Convert A Video Link” tab to enter the convert page.

Step 2: Copy and paste the link
Copy and paste the Vimeo video link that you want to convert.

Step 3: Select “.mp4” in the format field
Click the format tab and then choose “.mp4” format.

Step 4: Select the video quality
Click the “Video Quality” tab and then choose one of them such as HD1080p.

Step 5: Click “Start” tab
Click on the “Start” button to begin the conversion process.

ClipConverter
Step 1: Enter ClipConverter website
Go to the ClipConverter page.

Step 2: Copy and paste the link
Simply put the Vimeo movie page URL you copied into the box below to begin the conversion process.

Step 3: Select MP4 format
Click MP4, and after selecting the conversion format, you can also adjust the start and end time.

Step 4: Click “Continue” tab
Click the Continue option to convert. If you just want to download the video and don’t want to convert it, you can just click Download.

2. Pros and Cons of Online Video Converters
Pros of online video converters:
-
Convenient: They can be accessed and used from anywhere with an internet connection.
-
Free: Many online video converters are available for free without requiring any software installation.
-
User-friendly: Online video converters are often easy to use and don’t require any technical expertise.
-
No installation required: Online converters don’t require any software installation, which can be a time-saver and convenient for users.
-
Multiple format support: Online video converters can often convert videos to multiple formats.
-
No storage space required: Online converters don’t take up any storage space on your device.
Cons of online video converters:
-
Limited features: Online converters often have limited features and customization options.
-
Dependence on internet connection: The conversion speed and success depend on the quality and speed of the internet connection.
-
Security risks: Some online converters may be unsafe or contain malware, so users need to be careful when choosing a converter.
-
File size limitations: Some online converters may have file size limitations, which can be a problem when converting large video files.
-
Quality loss: The video quality may be reduced during the conversion process, especially if the file is compressed to a smaller size.
3. A Step-by-Step Guide to Using Video Converter Software
Software options refer to desktop applications that can be downloaded and installed on your computer to convert videos from one format to another. These applications usually offer more advanced features and greater control over the conversion process than online converters. Here are some steps to using converter software:
Any Video Converter
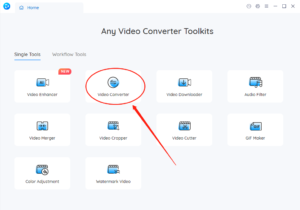
Step 1: Open the Video Converter Tool
Open the Video Converter Tool and select “Video Converter” from the “Single Tools” section on the main interface.
Step 2: Add Vimeo video files
Add the Vimeo video files you downloaded before by clicking the “+ Add Video” button or dragging and dropping them into the tool.

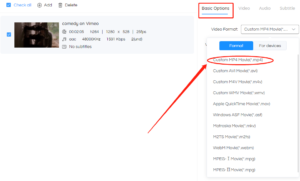
Step 3: Choose MP4 as the file type to be produced
In the “Basic Options” section, select MP4 as the output format for the converted videos.
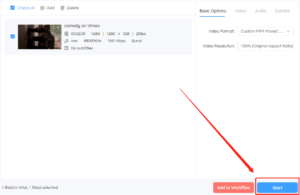
Step 4: Start the conversion process
Click on the “Start” button to begin the conversion process.
Freemake Video Converter
Step 1: Open Freemake Video Converter and add your Vimeo video
Open the Freemake Video Converter and click on the “+Video” button to add the Vimeo video file you want to convert.

Step 2: Choose “to MP4” as the output format
Choose “to MP4” as the output format by clicking on the “to MP4” button at the bottom of the program window.

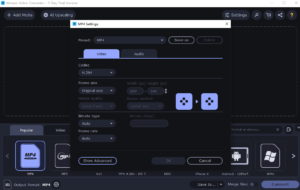
Step 3: Customize video settings with “Settings”
If you want to adjust the video settings, click on the “Settings” button to customize the video codec, frame rate, bitrate, resolution, and more.

Step 4: Click “Convert” to start the conversion
To initiate the converting process, click the “Convert” button. Freemake Video Converter will automatically convert your Vimeo video to MP4 format.

Movavi Video Converter
Step 1: Open Movavi Video Converter and Add Vimeo Video
Open the Movavi Video Converter on your computer and click on the “Add Media” button.

Step 2: Choose MP4 as Output Format
Choose “MP4” as the output format.

Step 3: Adjust Output Settings (Optional)
If you need to adjust the output settings, click on the “Settings” button and modify the codec, resolution, bitrate, and other parameters.
Step 4: Start the Conversion Process
Click on the “Convert” button to start the conversion process.

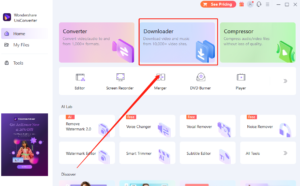
Wondershare Uniconverter
Step 1: Open UniConverter and select the “Downloader” tab
Open Wondershare UniConverter and click on the “Downloader” tab.
Step 2: Copy the video URL and click on “Paste URL” in UniConverter
Go to the website where the video is located and copy its URL. Back in Wondershare UniConverter, click on the “Paste URL” button. The video will automatically be analyzed and the available resolutions and formats will be displayed.

Step 3: Choose MP4 format from the list of available formats
Choose the MP4 format from the list of available formats.

Step 4: Select “Download then Convert”
Choose the “Download then Convert” option. Here you can also choose the preferred output format and quality for the video.

Step 5: Click “Download” to start the process
Finally, click on the “Download” button to start the download process. After finishing, the video will be stored on your computer in MP4 format.
4. Advantages and Disadvantages of Video Converter Software
Advantages of video converter software:
-
Often have more advanced features and settings for customization
-
Can convert large files more quickly than online converters
-
No internet connection required
-
Can convert multiple files at once
-
Can sometimes convert DRM-protected files
Disadvantages of video converter software:
-
Generally more expensive than online converters
-
Need to download and install software onto your device
-
Can take up storage space on your device
-
May not be as user-friendly as online converters for beginners
-
May require updates or have compatibility issues with certain devices or operating systems
5. Conclusion
There are several options available for converting videos to MP4 format, including online video converters and desktop software. Online converters are convenient and easy to use, but may have limitations such as file size restrictions and dependence on a stable internet connection. Desktop software offers more advanced features and greater control over the conversion process, but may require a one-time purchase or subscription fee. You should weigh the benefits and drawbacks of each choice carefully before making a final decision. Regardless of which method you choose, converting videos to MP4 format can be a useful tool for viewing videos on various devices and platforms.