How to Record Free MP3 Using Wondershare Filmora: 6 Steps to Convert Video to MP3


1. What are the Benefits of Recording Free MP3 using Wondershare Filmora?
✎Convert video files to MP3 files
Wondershare Filmora is a powerful program that can help you convert video files to MP3 files quickly and easily.
With its intuitive interface and comprehensive media editing tools, you can easily convert your video files to MP3 format with just a few simple steps. Follow these simple steps
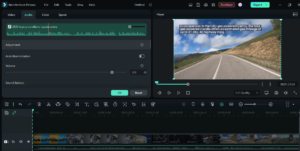
1. Open Wondershare Filmora and import the video.
2. Trim the footage to get the exact part you want to convert.
3. Select the MP3 format from the Format tab.
4. Choose the audio bitrate and sample rate that you want.
5. Click on the ‘Export’ button to start the conversion procedure.
Wondershare Filmora is one of the most popular applications for converting video files to audio, and it allows you to customize your desired output settings to make sure you get the perfect audio conversion you need.
✎Easily convert audio files from various sources
Powerful video editing programme Wondershare Filmora also supports audio file conversions.
This software can be used to convert audio files, including MP3 files, and many other formats. The following steps explain how to use Wondershare Filmora to convert audio files:
Step 1: Launch Wondershare Filmora on your computer and click “Import Media” to add the audio file you wish to convert.
Step 2: Once the file has been added to the timeline, click the “Export” button located at the bottom of the program to open the Export window.
Step 3: Select the “Audio” tab from the left side of the Export window and then choose the desired output format from the File Format dropdown.
Step 4: You can also customize the audio bitrate, sample rate, and other settings according to the desired output.
Step 5: Once you are done customizing the output settings, click on the “Export” button and the file will start converting to the selected audio format.
Benefits of Using Wondershare Filmora
Wondershare Filmora offers many advantages when it comes to audio file conversions such as:
✔Easy-to-use interface
✔Allows for customizing the output audio settings
✔Offers high-quality output audio files
✔Supported Audio Formats: Wondershare Filmora supports audio formats such as MP3, WMA, AAC, M4A, and WAV.
✎Support for multi-track recording and editing
Users of Filmora can record and edit numerous audio tracks simultaneously because of the software’s functionality for multi-track recording and editing.
It has over 172 music tracks and an audio mixer that can easily adjust each track individually.
Moreover, it provides a Denoise checkbox for background noise removal. Text-based audio editing is also supported, making it easier for anyone to edit audio and save time.
In 2022, it also allows users to upload their audio files more than once to create longer loops and save the file as one audio track.
✎Convert video files to various audio formats
Using Wondershare Filmora for converting video files to various audio formats is a simple and straightforward process. Here are the steps to convert video files to audio with Wondershare Filmora:
♠Download and Install Wondershare Filmora
Firstly, you will need to download and install Wondershare Filmora on your computer. Before that, make sure that your system meets the software requirements.
♠Import Your Video File
Once the installation is complete, launch Wondershare Filmora and click the Import button from the main interface. Click Open after choosing the video file you want to convert to audio.
♠Choose Audio Format
Press the “Export” button on the right side of the video, after importing the source video. From the Export window, select Audio as the Export Format and then choose an audio format (MP3, WAV, AAC, etc).
♠Choose Quality and Export
On the Export window, you can also adjust the audio quality according to your needs by choosing one of the two options, High Quality and Small Size. Finally, click Export to begin the conversion.
In this way, you can easily convert your video files to various audio formats using Wondershare Filmora.
✎Audio Editing Tools for Professional Audio Production
Wondershare Filmora is a powerful audio production software that offers a wide range of audio editing tools. These tools include:
-
Noise Reduction: Reduce background noise and improve the overall clarity of any audio track.
-
Audio Mixer: Adjust the levels and panning of audio tracks to create complex, multi-layered mixes.
-
Equalizer: Fine-tune the audio track for precise sound control.
-
Dynamics: Apply compression, expansion, limiting, and gating for more dynamic sound quality.
-
Reverb: Add depth and space to the soundtrack.
-
Pitch Correction: Automatically correct pitch issues and achieve perfect intonation.
-
Time and Pitch: Re-time and pitch-shift audio tracks.
-
Vocal Enhancer: Boost the frequency ranges to make vocals stand out.
-
Audio Effects: Add special effects like filters, distortions, and more.
✎Ability to add audio tracks to videos
Using Wondershare Filmora, recording free MP3s, and adding them to videos is a breeze. Follow these steps to get the best audio tracks.
-
Open the Wondershare Filmora and select ‘Audio Editor’ from the toolbar.
-
Select the ‘Record’ option and turn on the microphone.
-
Start recording your audio and make sure to save it once you’re done.
-
Now go to the ‘Video Editor’ mode in Filmora.
-
Load the video file into the program and drag and drop the audio file in the timeline.
-
Adjust the audio track’s volume and panning with the audio mixer.
-
Use the Silence Detection tool to cut out parts with no audio.
-
Press ‘Export’ to save the edited video with the new audio track.
You can also use Filmora’s Denoise tool to remove background noise and the Music stretching feature to fit your video.
There are also tons of background music tracks to choose from and a text-to-speech tool with 10 voice types.
With Wondershare Filmora, you can easily record, edit, and add audio tracks to videos.
2. How to Record Free MP3 using Wondershare Filmora?
Step 1: Choose a project
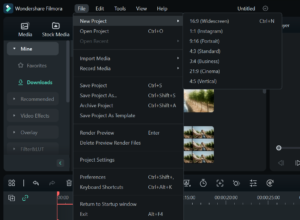
Wondershare Filmora offers the following projects:
Transcription Projects: This allows the users to transcribe audio into text in different languages. Users can start the transcription process by going to File > Transcribe Project in Audiate.
Video Projects: This lets users change a video from .wfp to .mp4. To do this, launch Filmora and go to Import Media from the Files tab and select ‘Import Media Files’.
Audio Projects: This enables users to edit MP3 files with Filmora Audio Editor. To do this, users need to first create a new project and then import the media file.
Step 2: Import WFP file
To import a Wondershare Filmora file, you need to have the Filmora software installed on your computer. Once installed, you can open the WFP file in one of the following ways:
-
Click on File > Open Project and select the WFP file from your computer’s local storage.
-
Click on File > Click on Recent to open recent projects.
-
Finally you can drag, drop, file in wondershare filmora.
Once the WFP file is loaded into Filmora, you can edit the project, add effects, transitions, titles and other settings. When you are finished, you can export the project as an MP3 file by hitting the export button and selecting MP3 from the Local category as the output file format.
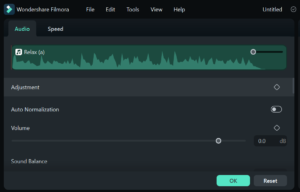
Step 3: Set up the audio editing panel
-
Download and install Wondershare Filmora.
-
Open the program and click on the Audio Editing Panel.
-
Import the audio file you wish to edit.
-
Drag the imported file into the timeline to start editing.
-
Double-click the audio file to open the Audio Editing Panel window.
-
Select and click the Start Recording button.
-
To cut, trim, split, and merge audio, drag the ends of the orange audio track.
-
To remove background noise, go to the Settings menu.
-
If you need to add more than three audio tracks, click on the timeline below the third track and choose Add Audio Track.
-
To import pre-recorded audio, go to the Mix tab and select Import Media.
-
To listen to each individual track, click on the S button (for Solo) on the audio track.
-
To record live audio, click the Down Arrow next to the Microphone on the track you wish to record on.
-
Set up the Recording Settings and click OK. Then, click the Microphone icon to begin recording.
-
To stop recording, click the Record Button.
-
Once you are satisfied with the editing, hit the Export button and select MP3 as the output format.
-
Finally, click Export to save the edited file to your device.
Step 4: Hit Record button to start recording
Step-by-Step Instructions for Recording Free MP3 Using Wondershare Filmora:
-
Download and install Wondershare Filmora Video Editor on your computer.
-
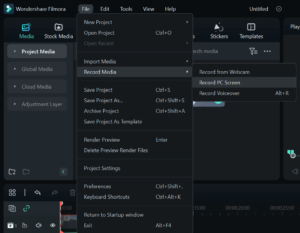
Open Filmora and select the “File” dropdown on the menu bar at the top of the interface, then click the “Record Media” option and select the “Record PC Screen” button.
-
Uncheck the microphone and mouse clicks to avoid affecting the audio recording.
-
Open the YouTube video you want to record and click the “Rec” button. Play the video to begin recording and click the “Stop” button when you are done.
-
After stopping the recording, the file will appear on the program. Drag it to the timeline and edit the file if needed.
-
To export the file, click the “Export” button and choose the output format (MP3).
-
The file will be saved to your computer.
Step 5: Convert and export WFP to MP3
Converting and exporting a WFP file to MP3 is an easy process that can be done with Wondershare Filmora. Here is a step-by-step instructions on how to do so:
-
Open Wondershare Filmora and import the WFP file into the program.
-
Drag the imported footage to the Timeline at the bottom of the window and trim off the unwanted sections from the clip if necessary.
-
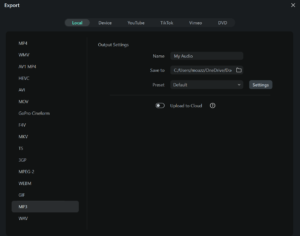
Press the ‘Export’ button and select the MP3 on the bottom.
-
Adjust other preferences by clicking the ‘Settings’ button from the right and click ‘Export’ from the bottom-right corner.
That’s it! The WFP file will now be converted and exported to an MP3 file.
Step 6: Importing other audio files
Wondershare Filmora is a powerful audio editor that allows users to import, edit and combine audio files from different sources.
In addition to the popular MP3 format, it also supports other audio file formats such as .wav, .m4a and .mp4. Here are the steps to import other audio files into Wondershare Filmora:
-
Create a new project in Wondershare Filmora.
-
Go to the Files tab and select ‘Import Media’.
-
Select ‘Import Media Files’ and browse for the audio file you want to import.
-
Select the audio file and click ‘Open’ to import it into the project.
-
Drag and drop the audio file onto the timeline to start editing.
By following these steps, you can easily import audio files into Wondershare Filmora and begin editing.
3. Final Thougts
Wondershare Filmora is a powerful and versatile software that can help you convert video files to MP3 or various audio formats, record and edit audio files, and add audio tracks to videos. With its user-friendly interface and comprehensive audio editing tools, Filmora makes it easy for anyone to create high-quality audio files for personal or professional use. Whether you’re a beginner or an experienced audio editor, Wondershare Filmora is an excellent choice for your audio editing needs.