[Latest Updated] How to Recover Outlook Deleted Emails?

Is it possible to recover deleted emails from Outlook? How can we safeguard our emails in the future to prevent such data loss? In this paper, we delve into the methods for recovering deleted Outlook emails and explore effective strategies to protect our emails from potential threats, ensuring a secure and seamless email experience.
1. Can We Recover Deleted Emails from Outlook?📧
Yes, it is probable to recover deleted emails from Outlook under certain conditions. Outlook provides built-in features that allow users to recover deleted emails within a specific timeframe, and there are also third-party data recovery tools available to retrieve deleted emails beyond the built-in recovery period. However, it is essential to act promptly after realizing the deletion to increase the chances of successful recovery.
2. How to Recover Outlook Deleted Emails?
Losing important emails can be distressing, especially when they contain crucial information for work or personal matters. Fortunately, Outlook provides several built-in features that can help recover deleted emails. In this guide, we will walk you through the process of recovering deleted Outlook emails using the following methods:
Method #1: Restore Deleted Outlook Emails from the ‘Deleted Items’ Folder
Outlook automatically moves deleted emails to the ‘Deleted Items’ folder. By default, these emails remain in the folder for a specific period, usually 30 days, before being permanently deleted. To recover emails from the ‘Deleted Items’ folder, follow these steps:
a. Open Outlook and navigate to the ‘Deleted Items’ folder located in the left sidebar.
b. Browse through the list of deleted emails to find the one you want to recover. If you have numerous emails, you can use the search bar to locate specific messages.
c. Once you’ve found the email you want to restore, right-click on it and select ‘Move > Other Folder’ from the context menu.

d. Choose the folder where you want to move the recovered email, or you can select ‘Inbox’ to restore it to the original location.
e. The email will now be moved back to the selected folder, and you have successfully recovered it.
Method #2: Restore Emails from the ‘Trash’ Folder
If you access your Outlook account through certain platforms or devices, deleted emails may be sent to the ‘Trash’ or ‘Recycle Bin’ folder. To recover emails from the ‘Trash’ folder, follow these steps:
a. Access your Outlook account through the platform or device where the ‘Trash’ folder is located.
b. Locate the ‘Trash’ folder in the email interface.
c. Find the deleted email you wish to recover and click on it to select it.

d. Look for the ‘Restore’ or ‘Move to Inbox’ option and click on it.
e. The email will now be moved back to your Inbox or the selected folder, effectively recovering it.
Method #3: Explore the ‘Recoverable Items’ Folder
If you have emptied the ‘Deleted Items’ folder or the emails you are looking for are not there, there is still hope. Outlook has a hidden folder called ‘Recoverable Items’ that temporarily stores permanently deleted emails for a limited period. To explore and recover emails from the ‘Recoverable Items’ folder, follow these steps:
a. In Outlook, go to the ‘Home’ tab on the top ribbon.
b. Click on the ‘Deleted Items’ folder to open it.
c. On the top menu, select ‘Recover Deleted Items from Server.’

d. A new window will open displaying all the emails in the ‘Recoverable Items’ folder.
e. Find the email you want to recover, select it, and click on the ‘Recover Selected Items’ button.
f. The email will now be restored to the ‘Deleted Items’ folder or the folder from which it was initially deleted.
Method #4: Utilizing the Archive Folder
If you have enabled the Auto-Archiving feature in Outlook, deleted emails might be present in the Archive folder. This feature automatically moves older emails to the Archive folder, providing another chance to recover them. To utilize the Archive folder to recover deleted emails, follow these steps:
a. Open Outlook and locate the ‘Archive’ folder in the left sidebar.
b. Browse through the archived emails to find the one you wish to recover.
c. Right-click on the email and select ‘Move > Other Folder.’

d. Choose the destination folder where you want to move the email, or select ‘Inbox’ to restore it to its original location.
e. The email will now be moved back to the selected folder, effectively recovering it.
Remember, the success of recovering deleted Outlook emails depends on how quickly you act and the retention period set for deleted items in your Outlook account. Therefore, it’s crucial to check the ‘Deleted Items’ folder regularly and avoid permanent deletion until you are certain you no longer need the emails. In cases where built-in recovery options are insufficient, consider using reputable data recovery software to increase your chances of retrieving deleted emails.
3. How to Quickly Recover Outlook Deleted Emails?
Accidentally deleting important emails in Outlook can be a stressful experience, especially when they contain crucial information for work or personal use. To quickly recover Outlook deleted emails, you can rely on a powerful data recovery tool like Tenorshare 4DDiG.
Step 1: Download and Launch 4DDiG Data Recovery
Begin by downloading Tenorshare 4DDiG Data Recovery to your computer. Once the download is finish, follow the on-screen instructions to install the software. After successful installation, launch the 4DDiG Data Recovery software, and you will be directed to the main interface, which offers various recovery options.
Step 2: Select the Location and Initiate the Scan
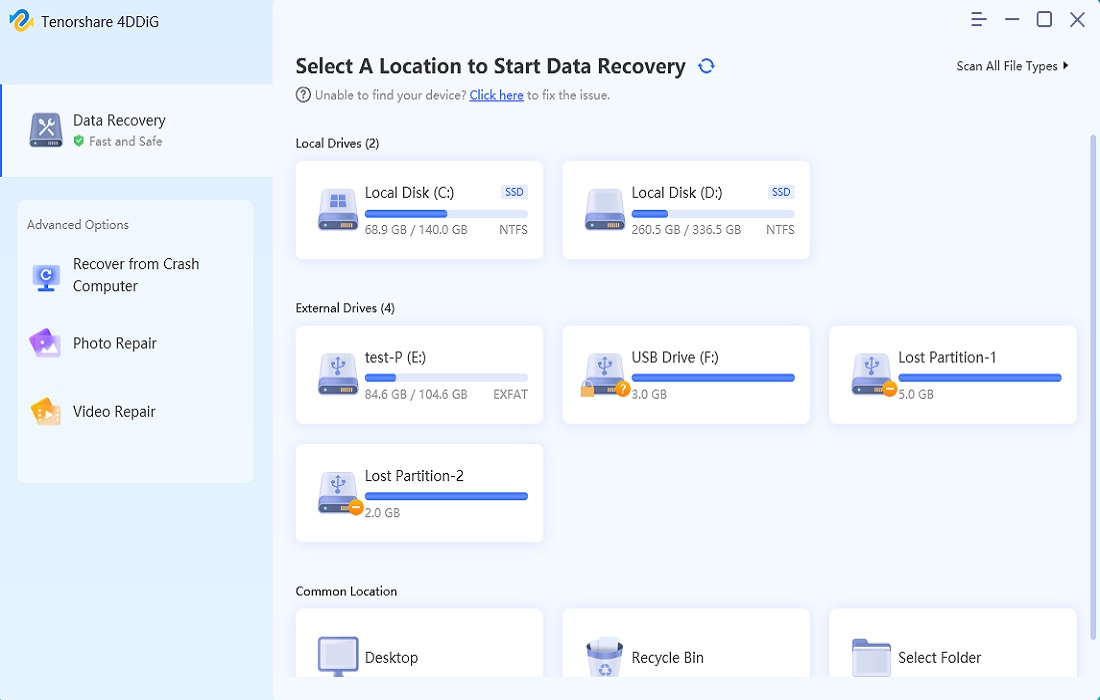
On the main interface of 4DDiG Data Recovery, you will see a list of available drives and storage devices. Choose the drive or location where your Outlook emails were stored before deletion. If the emails were stored on the system drive (e.g., C:), select that drive for a quicker scan. Alternatively, you can choose a specific folder or an external storage device.
Once you have chosen the location, click on the “Scan” button to begin the scanning process. The software will begin searching for the deleted Outlook emails on the selected location.
Step 3: Monitor the Scan Progress and Preview Files
The scanning process will now start, and you can monitor its progress through the provided progress bar, which shows the completion percentage. The time it takes to complete the scan depends on the size of the selected location and the speed of your computer.
During the scan, 4DDiG Data Recovery will find and display the recoverable Outlook emails in real-time. You will be able to preview the emails as they are found during the scan. This feature allows you to verify the integrity of the recovered files.
Step 4: Preview and Select the Target Emails
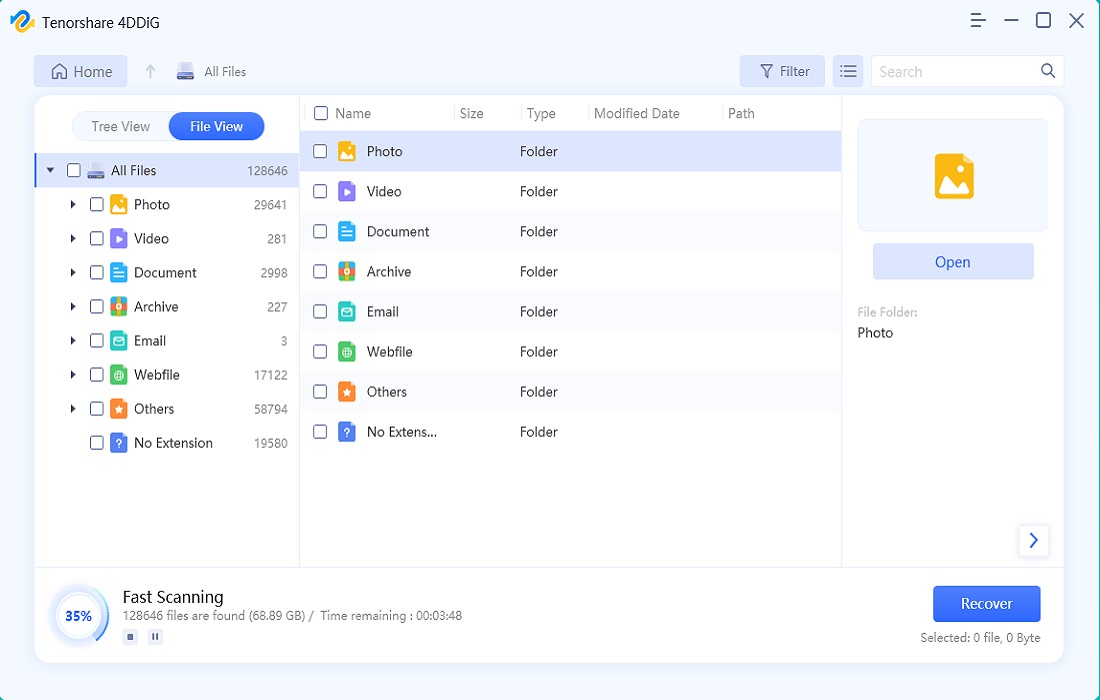
Once the scan is completed, you will be presented with a list of recovered Outlook emails. Take your time to carefully preview the emails and ensure they are the ones you want to recover. You can open each email to verify its content and attachments.
After reviewing the emails, select the ones you want to recover by ticking the checkboxes next to their names.
Step 5: Recover and Save the Outlook Emails

With the desired emails selected, click on the “Recover” button to initiate the recovery process. 4DDiG Data Recovery will prompt you to choose a safe location to save the recovered Outlook emails. It is essential to select a different drive or storage device to avoid overwriting the data.
Once you’ve chosen the destination, click “Recover,” and the software will swiftly restore the selected Outlook emails to the specified location.
Congratulations! You have successfully recovered your deleted Outlook emails using 4DDiG Data Recovery. Always remember to act promptly when you realize you’ve deleted important emails to increase the chances of successful recovery. Additionally, regularly backup your Outlook emails to avoid data loss in the future.
4. Tips for Safeguarding Your Outlook Emails in the Future
Securing your Outlook emails is essential to safeguard sensitive information, maintain privacy, and prevent data breaches. By implementing effective strategies, you can enhance the protection of your emails and ensure a safer digital communication experience. Here are some original tips for protecting your Outlook emails in the future:
Tip 1:Use Strong Passwords
Set strong and unique passwords for your Outlook account. Avoid using easily guessable combinations and opt for a mix of uppercase and lowercase letters, numbers, and special characters.
Tip 2: Enable Two-Factor Authentication (2FA)
Activate 2FA for an extra layer of security. This feature requires a secondary verification method, such as a text message or authenticator app, in addition to your password.
Tip 3: Be Cautious with Email Links and Attachments
Avoid clicking on suspicious links or downloading attachments from unknown senders. These could contain malware or phishing attempts.
Tip 4: Update Software Regularly
Keep your Outlook and antivirus software up to date. Regular updates patch security vulnerabilities and protect against emerging threats.
Tip 5: Avoid Using Public Computers
Refrain from accessing your Outlook account on public computers, as they may be compromised or have keyloggers that can capture your login information.
5. The Bottom Line
Recovering deleted Outlook emails is indeed possible, thanks to the built-in recovery features and reliable data recovery tools like 4DDiG. Acting promptly after deletion and utilizing the right recovery method are crucial to successful retrieval. By these tips and staying vigilant, users can ensure a safer and more secure email communication experience in the future. Remember, taking proactive measures to protect emails is key to safeguarding sensitive information and maintaining digital privacy.