How to Change JFIF to JPG in Windows 10: Simple Conversion Methods

Converting image file formats is a common task for many Windows 10 users, and one such conversion is from JFIF to JPG. JFIF (JPEG File Interchange Format) and JPG (Joint Photographic Experts Group) are both popular image formats, but sometimes it becomes necessary to convert JFIF files to the more widely supported JPG format. In this guide, we will investigate the various Windows 10 conversion options available to us.
1. Methods of Converting JFIF to JPG in Windows 10
Using Windows 10 Photos App

The Windows 10 Photos app is a built-in application that supports users to view and edit images. It also provides the ability to convert image file formats, including JFIF to JPG. To use this method:
-
Open the Windows 10 Photos app.
-
Select the “Import” button to import the JFIF image file.
-
Once imported, click on the “Save a copy” option.
-
Choose the “JPG” format as the output format.
-
Click the desired location to save the converted file.
-
Select the “Save” button to initiate the conversion process. The JFIF file will be converted to JPG and saved in the specified location.
Renaming the file extension

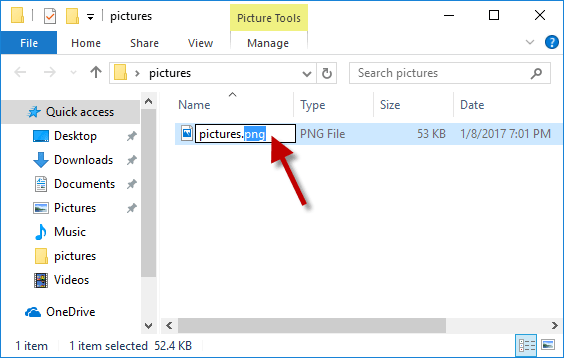
Another method to convert JFIF to JPG in Windows 10 is by manually renaming the file extension. This method is simple and doesn’t require any additional software. However, it’s important to note that renaming the file extension does not actually convert the file content, but rather changes the file format identifier. To use this method:
-
Find the JFIF file that you wish to convert.
-
Right-click on the file and select “Rename.”
-
Change the file extension from “.jfif” to “.jpg”.
-
Confirm the change when prompted.
The JFIF file will now be recognized as a JPG file, allowing you to open and use it as a JPG image.
Using Conversion Tools
Various third-party conversion tools are available for Windows 10, offering more advanced features and customization options for converting JFIF to JPG. These tools can handle batch conversions, apply image enhancements, and provide additional format options.
2. How to Change JFIF to JPG in Windows 10 Online?
To convert JFIF to JPG in Windows 10 using online free tools, you can follow these steps:
Step 1: Identify reliable online conversion tools
There are numerous free online utilities available for converting JFIF to JPG format.
-
Online-Convert (https://www.online-convert.com/)
-
Zamzar (https://www.zamzar.com/)
-
Convertio (https://convertio.co/)
Step 2: Select an online tool
Launch a web browser on your Windows 10 computer and navigate to the online tool’s website.
Step 3: Upload the JFIF file
Look for the “Upload” or “Choose File” button on the website’s homepage or conversion page. Click on it to browse and select the JFIF file you want to convert.
Step 4: Choose the output format
Once the JFIF file is uploaded, locate the output format settings. Select “JPG” as the desired output format for the conversion.

Step 5: Adjust optional settings (if available)
Some online tools may offer additional options to customize the conversion process, such as image quality, resolution, or compression level. Adjust these settings according to your preferences.
Step 6: Start the conversion process
Find and select the “Convert” or “Start Conversion” button on the website to initiate the conversion procedure. The online tool will convert the JFIF file to JPG format.
Step 7: Download the converted file
Once the conversion process is complete, the online tool will provide a download link for the converted JPG file. Click on the download link to save the file to your Windows 10 computer.
Step 8: Verify the converted file
After downloading, locate the converted JPG file on your computer. Double-click on it to open and ensure that the conversion was successful.
Remember to be cautious while using online tools, especially when dealing with sensitive or confidential images. Ensure that you are using reputable and trusted websites to protect your data and privacy.
3. How to Change JFIF to JPG in Windows 10 Easily?
To change JFIF to JPG in Windows 10 easily using Wondershare UniConverter, follow these steps:
Step 1: Download Wondershare UniConverter

-
Access Wondershare Uniconverter‘s official website.
-
To install it on your computer, follow the instructions displayed on-screen.
Step 2: Open Wondershare UniConverter and Access Tools

-
Launch Wondershare UniConverter on your Windows 10 computer.
-
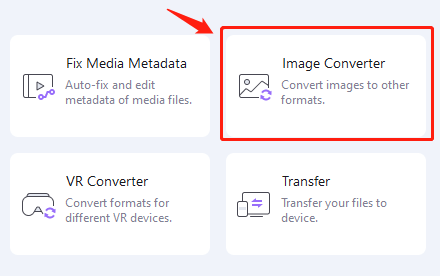
In the menu bar at the top, locate and click on the “Tool” option.
Step 3: Select Image Converter

-
From the tools menu, choose the “Image Converter” option.
-
This will open the Image Converter feature within Wondershare UniConverter.
Step 4: Add the JFIF Image

-
In the Image Converter window, click on the “Add Files” button.
-
Browse and select the JFIF image file you want to convert.
-
Click on the “Open” button to add the JFIF image to the converter.
Step 5: Choose JPG as the Converted Format

-
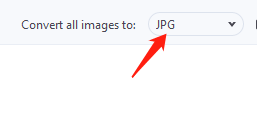
After importing the JFIF file, select a destination format from the “Convert all images to:” drop-down menu.
-
Select “JPG” as the desired output format for the conversion.
Step 6: Start the Conversion Process

-
Select the folder to store the resulting JPG before beginning the conversion.
-
Once you’ve set the destination folder, click on the “Convert” button located at the bottom-right corner.
Wondershare Uniconverter will now convert the JFIF image to JPG format based on your selections.
The converted JPG file can be located in the target folder when the conversion is complete. You have successfully changed the JFIF image to JPG format using Wondershare UniConverter in Windows 10.
4. Final Thoughts
Converting JFIF to JPG in Windows 10 is a simple process. Whether using built-in tools, online converters, or third-party software, choose a method that suits your needs. Ensure file integrity and choose reputable tools. Enjoy the benefits of the widely supported JPG format for your images.
