How to Make a Video with Live Photos?

In our digital age, memories are no longer confined to static images. With the advent of Live Photos, a feature pioneered by Apple, capturing moments has transcended traditional photography, ushering in a new era of dynamic storytelling. In this article, we delve into the essence of live photos, exploring their significance and providing a step-by-step guide on how to transform them into captivating videos.
1. Understanding Live Photos
Live Photos seamlessly blend the stillness of a photograph with the vitality of a short video clip. Introduced in 2015 with the release of the iPhone 6s, Live Photos revolutionized the way we perceive and interact with images. When you capture a Live Photo, your device records a 3-second video clip, encompassing 1.5 seconds of motion before and after the shutter is pressed. This amalgamation of motion and stillness imbues images with a sense of life, allowing you to relive cherished moments in all their dynamic glory.
2. How to Capture Live Photos
Capturing Live Photos is a straightforward process on compatible devices. Here’s a simple guide to capturing Live Photos:
- Open your Camera App: Launch the camera app on your iPhone or iPad.
- Enable Live Photos: Ensure that the Live Photos feature is enabled. You can do this by tapping on the Live Photos icon located at the top of the screen. When activated, the icon will turn yellow.
- Capture the Moment: Frame your shot and press the shutter button to capture the Live Photo.
- View Your Live Photo: To view your Live Photo, navigate to the Photos app and locate the image you just captured. Press and hold on the image to animate it.
3. How to Make a Video with Live Photos?
Now that you’ve captured your Live Photos, it’s time to transform them into captivating videos. Below, we outline several methods to convert live photos to a video:
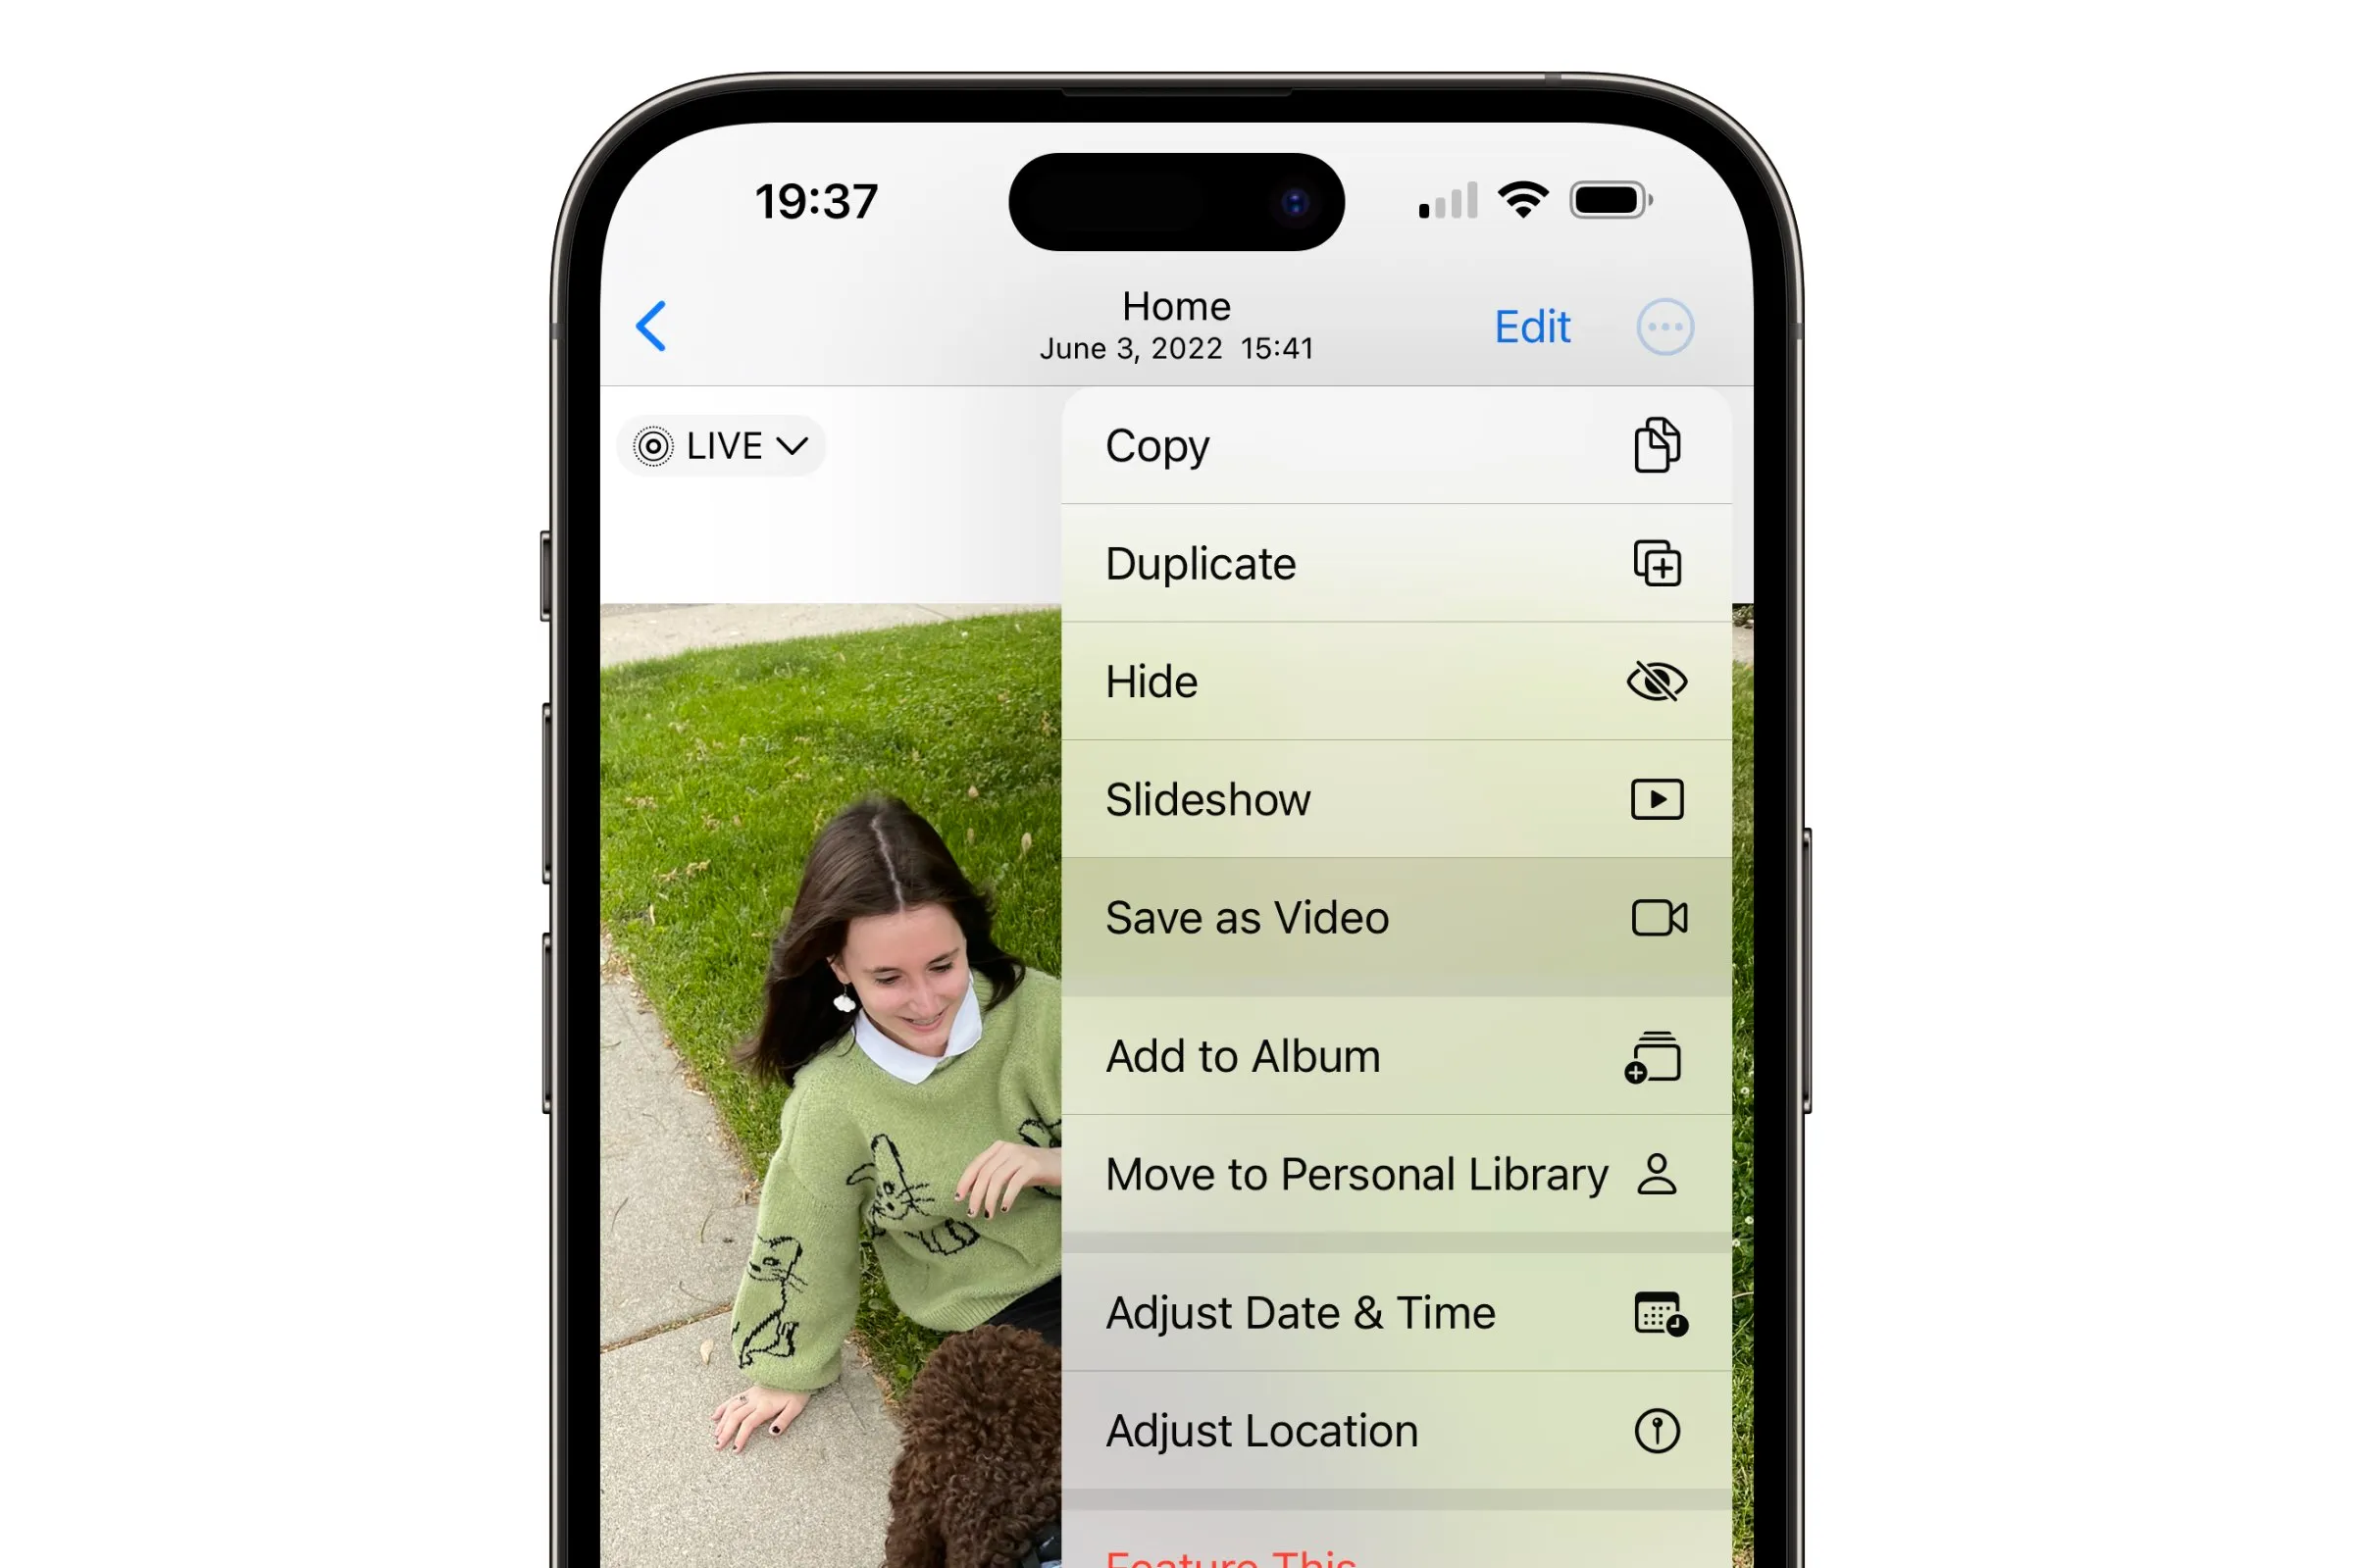
3.1 Save live photos as Video on an iPhone or iPad
“Save Live Photos as a Video” on iPhone or iPad is a feature that allows users to convert their dynamic live photos into shareable video clips. Here’s how you can easily convert live photos into videos on your iOS device:
- Open the Photos app by tapping on its icon.
- Browse and select the live photo you wish to convert. Your live photos are conveniently organized into an album for easy access.
- Locate and tap the Share button, typically found in the bottom left corner of the screen.
- Navigate through the options and opt for “Save as Video”.
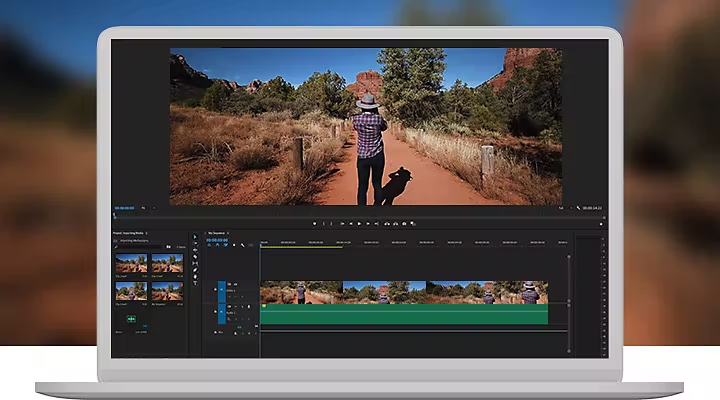
3.2 Convert Live Photos into Video using Premiere Pro
Adobe Premiere Pro is a powerful video editing tool widely used by professionals and enthusiasts alike. With Premiere Pro, you can harness the full potential of your live photos by converting them into high-quality video content.
By following these steps, you can seamlessly convert live photos into compelling videos using Adobe Premiere Pro:
- Access your iCloud Photos on your computer. You can do this by opening the Photos app on a Mac or downloading iCloud Photos for Windows from Apple’s support site or iCloud.com.
- Choose the live photos you wish to import into Premiere Pro. Each live photo will consist of two files: one image in .heic format and one video file in .mov format.
- Press and hold the Option key, then drag and drop the selected files to a new Finder window to save them to your desktop.
- Launch Premiere Pro and import your clips by dragging and dropping them into the program. Now, you’re ready to unleash your creativity and start editing your video.
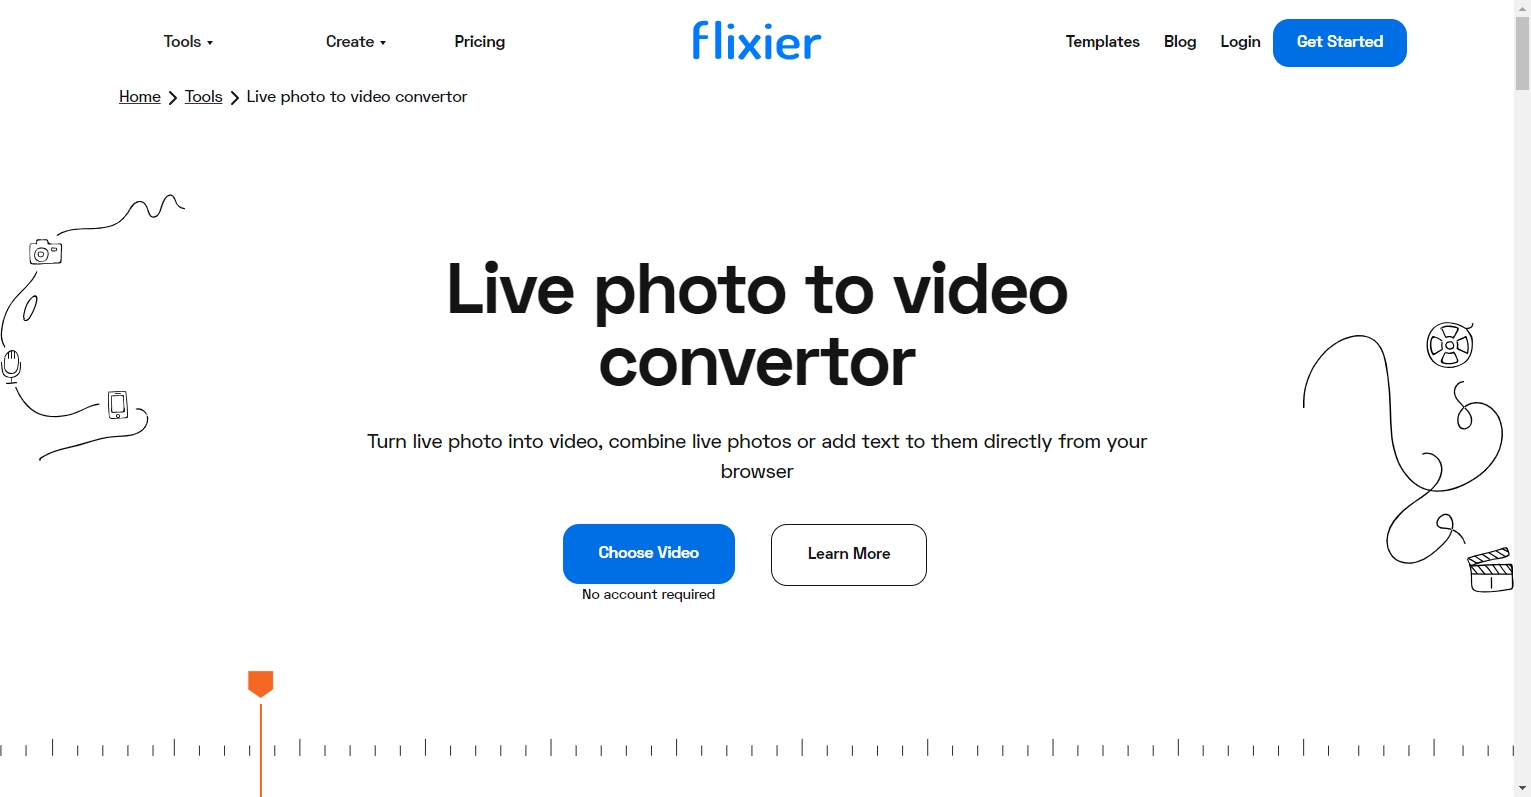
3.3 Convert Live Photos into Video using Online Converters
Online converters provide a simple and accessible solution for converting live photos into videos without the need for specialized software. These platforms typically support various file formats and offer user-friendly interfaces, making the conversion process hassle-free.
To convert live photos into video using online converters, follow these general steps:
- Start by selecting a reputable online converter that supports live photo conversion, such as “Flixier Live Photo to Video Converter“.
- Once you’ve chosen your preferred online converter, navigate to the website and locate the upload button. Click on it to select the live photo file you want to convert.
- After uploading your live photo, you’ll typically be prompted to choose the output format for your video. Common options include MP4, MOV, or GIF, and you can select the desired format according to your preference.
- Once you’ve configured the settings to your liking, initiate the conversion process by clicking on the “Convert” or “Start Conversion” button. The converter will then process your live photo and transform it into a video file.
- Once the conversion is complete, save the video to your desired location on your device.
3.4 Convert Live Photos into Video Using Lively App
The Lively app, available on the App Store for iOS devices, simplifies the process of converting live photos into videos. It provides a straightforward interface and intuitive features for users to create engaging video content from their live photos collection.
To convert live photos into a video using the Lively app, follow these general steps:
- Start by downloading and installing the Lively app from the App Store on your iOS device. Once the installation is complete, open the Lively app on your device.
- From the app’s interface, browse through your Live Photos and select the one you want to convert into a video.
- Depending on your preferences, you may have the option to customize settings such as video resolution and frame rate.
- After customizing the settings, initiate the conversion process by tapping on the “Export” or “Convert” button within the app.
- Once the conversion is complete, you’ll be prompted to save the video to your device’s camera roll or share it directly on social media platforms.

4. Conclusion
Throughout this article, we’ve explored the significance of live photos and provided different methods on how to transform them into captivating videos. Each method offers a unique approach, catering to different preferences and workflows. Whether you prefer the convenience of built-in tools, the versatility of professional software like Premiere Pro, the accessibility of online converters, or the simplicity of apps like Lively, there’s a solution tailored to your needs.